
Set Up Google Analytics Ecommerce Tracking with Google Tag Manager

Colin Differ
18 June 2020
If you manage any kind of website that takes monetary transactions and use Google Analytics, it’s essential to set up Google Analytics Ecommerce Tracking. Unfortunately, how to set it up is still widely misunderstood due to the fact it will need development work on the website. So, here we’ll discuss what you’ll need to do, and what your development team will need to do. This article is for those who use Google Tag Manager to fire their Google Analytics tags into their website.
What is Ecommerce Tracking in Google Analytics?
Whereas Google Analytics is a session-based tool which primarily tells you what pages people have viewed on your website, Ecommerce tracking is slightly different as it pulls transaction information from your confirmation or thank you page into the Ecommerce report in Google Analytics.
There are 2 different types of Ecommerce Tracking in Google Analytics:
What is Standard Ecommerce in Google Analytics?
Standard Ecommerce is the basic use of Ecommerce tracking in Google Analytics, which allows you to track transactions on the Confirmation/Thank You page
- Total Revenue
- Transaction ID
- Total Tax Cost
- E-Commerce Conversion Rate
- Products Purchased
- Name of products purchased
- The number of products purchased
- Category of products purchased
- SKU/ID of products purchased
- Price of products purchased
What is Enhanced Ecommerce in Google Analytics?
Enhanced Ecommerce adds additional reporting to Standard Ecommerce in Google Analytics and allows you to track transaction processes from the category page, to adding to the cart, to payment method, to shipment, to review, and finally to check-out. Effectively, Standard Ecommerce tells you what people buy, Enhanced Ecommerce tells you how they buy it (or in fact, don’t buy it at all).
In addition to the above, Enhanced Ecommerce will track the following:
- Checkout Behaviour Report
- Understand where people are joining and dropping out of the checkout process
- Where people are making changes to their basket in the checkout process
- Product Performance report:
- Find out which products are customers really interested in (Product Detail Views) but never get beyond first base (Cart-to-Detail ratio)?
- Which products sell really well (Cart-to-Detail ratio) but rarely get a look-in (Product Detail Views)?
- Product List Performance Report – allows you to track how groupings of Products/geographical areas are performing on the site with the following metrics:
- Product List Views (number of times users viewed products when they appeared in the product list)
- Product List Clicks (number of times users clicked products when they appeared in the product list)
- Product List CTR (the rate at which users clicked the product list to view product (number of clicks divided by the number of times the list appeared)
- Internal Promotion Report (optional) – lets you see how your internal promotions (banners etc.) performed in terms of the following metrics:
- Internal Promotion Views (number of times users viewed internal promotions)
- Internal Promotion Clicks (number of times users clicked internal promotions)
- Internal Promotion CTR (the rate at which users click internal promotions (views/clicks)
- Order/Product Coupon Reports
- Track which coupons/vouchers are generating revenue from an order or product level
This article talks about how to set up Standard Ecommerce in Google Analytics using Google Tag Manager. If you are new to Ecommerce Tracking in GA, specifically setting it up, I would start with this as Enhanced Ecommerce is a lot more labour intensive from a development point of view and will take a certain amount of knowledge from the Analytics user to understand what they/you need.
We will write a separate article about Enhanced Ecommerce soon, but if you would like some help setting it up in the meantime, please Contact Us.
Setting Up Google Analytics Standard Ecommerce with Google Tag Manager
The process for setting up Standard Ecommerce with Google Tag Manager is as below:
- Create a Standard Ecommerce Data Layer
- Create a Google Analytics Transaction Tag in Google Tag Manager
- Enable Ecommerce in Google Analytics
- Test
- Publish
1. Create a Standard Ecommerce Data Layer
If you’ve been using Google Tag Manager for a while, you will have heard about Data Layers, if not by focusing on Ecommerce, you’re about to. That’s because Data Layers are the most important aspect of Ecommerce Tracking. Without them, it simply won’t work.
What is a Data Layer?
Essentially, a Data Layer is a piece of JavaScript on a page which stores particular information in a certain format. It’s a Layer of Data; in this case, it’s transaction Data. The Data Layer can not be seen by your users (unless looking at the source code or through a tool), but it can be read by Google Tag Manager and if certain parameters are used that same information can be pulled into Google Analytics.
We mentioned before, that setting up Ecommerce in Google may involve your developers, it’s the Data Layers which they will need to set up.
It’s worth noting that CMS systems such as WordPress using WooCommerce, Joomla, Drupal etc will create Data Layers for you. However, if you don’t understand JavaScript or HTML, then it may be best to speak to a dev first.
What is the Google Analytics Standard Ecommerce Data Layer?
For Google Analytics to understand transaction data, the Data Layer has to be set out in a particular way, and use exact parameters. Whilst some of the parameters are optional, any deviation from the naming convention below will mean the data will not be pushed into Google Analytics.
An example of the Data Layer is below:
<script>
window.dataLayer = window.dataLayer || [];
dataLayer.push({
   'transactionId': '987654',
   'transactionAffiliation': 'Propellernet Clothes Ltd',
   'transactionTotal': 155,
   'transactionTax': 30,
   'transactionShipping': 5,
   'transactionProducts': [{
       'sku': 'PNETShoe11',
       'name': 'Propellernet Shoes v11',
       'category': 'Shoes',
       'price': 50,
       'quantity': 2
   },{
       'sku': 'PNETSocks2',
       'name': 'Propellernet Socks v2',
       'category': 'Socks',
       'price': 10,
       'quantity': 5
   }]
});
</script>
Transaction Data
[table id=4 /]
Product Data (Optional)
[table id=5 /]
The Data Layer should be placed on your Confirmation page once the products have been bought and the value of that sale must be dynamically placed within the data layer for each individual transaction.
A couple of Points
Numbers in Data Layers
You may notice that within the Data Layer some values are captured within quote marks and some are not.
'category': 'Socks',
       'price': 10,
This is not a mistake. Whole numbers should not be captured in quote marks, whereas strings (letters, numbers and characters) should.
Transaction Products
Whilst capturing product information is optional, if you wish to do so, each product should be marked as above. If you only have 1 product, then place it as above. If you have 10 different products, you should have 10 Data Layer variables. However, if you have 1 product purchased 10 times in a single transaction, then you place this within ‘quantity’.
Currency
Do not add any currency symbols ($,£, €) into the Data Layer, it should be whole numbers only. You tell Google Analytics which currency you are using directly.
View Your Data Layer in Google Tag Manager
Once your Data Layer is live on the confirmation page, you can view it in Google Tag Manager in the Data Layer tab:
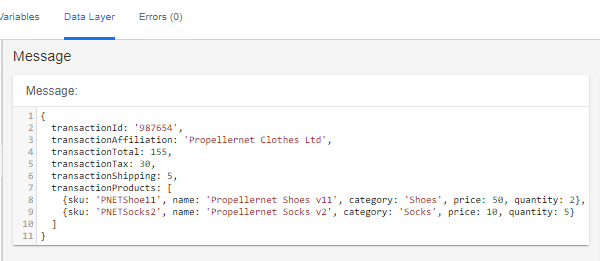
Once you are sure that your Data Layer is set up, you need to instruct Google Tag Manager to push the transaction data into Google Analytics.
Sign Up To Our Google Analytics Newsletter
2.Create a Google Analytics Transaction Tag in Google Tag Manager
If you are using Tag Manager for Google Analytics, you will already have a Google Analytics Page View tag set up. However, for standard Ecommerce, you need to set up another tag as well – a Transaction tag.
How to set up a Google Analytics Transaction Tag
- Add a new Google Analytics tag
- Select ‘Transaction as your Track Type
- Select Your Google Analytics setting variable or add your UA Number
- Name your Tag appropriately
- Create a Trigger so the tag fires on the page your Data Layer is held
- Test
- Publish
1. Add a new Google Analytics tag
Create a new Google Analytics tag as normal
2. Select ‘Transaction as your Track Type
3. Select Your Google Analytics setting variable or add your UA Number
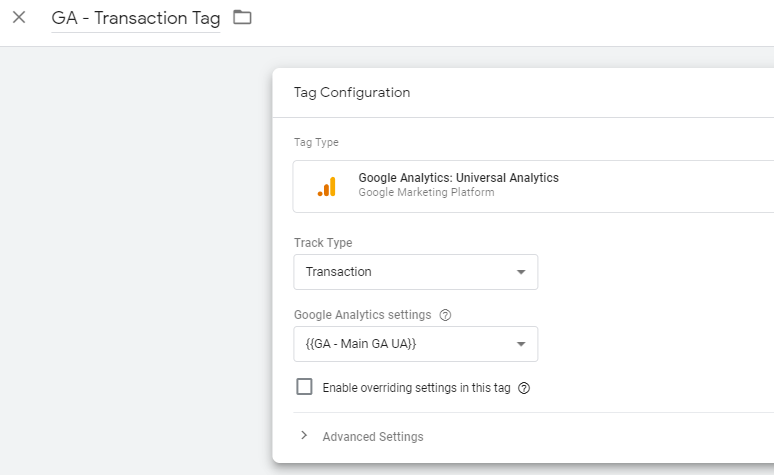
4. Name your tag appropriately
As with any tag within Google Tag Manager, you should always name it so that you know exactly what it does after it is published
5. Create a Trigger so the tag fires on the page your Data Layer is held
Your Transaction tag should only fire on the pages where the Data Layer fires.
THIS BIT IS IMPORTANT – The Tag should fire at the same time or after the initial Google Analytics Page View tag AND it should fire at the same time or after the Data Layer. If it fires before the Page View Tag or before the Data Layer, no transactions will be pulled into Google Analytics
6. Test
Using the debug tool (read our article on A guide on how to use Google Tag Manager preview & debug mode) and make a test transaction. Check if the tag fires on the right page, and at the same time as or after the Data Layer
7. Publish
Publish your GTM Container
Once that’s done, its time to tell Google Analytics to collect Ecommerce data.
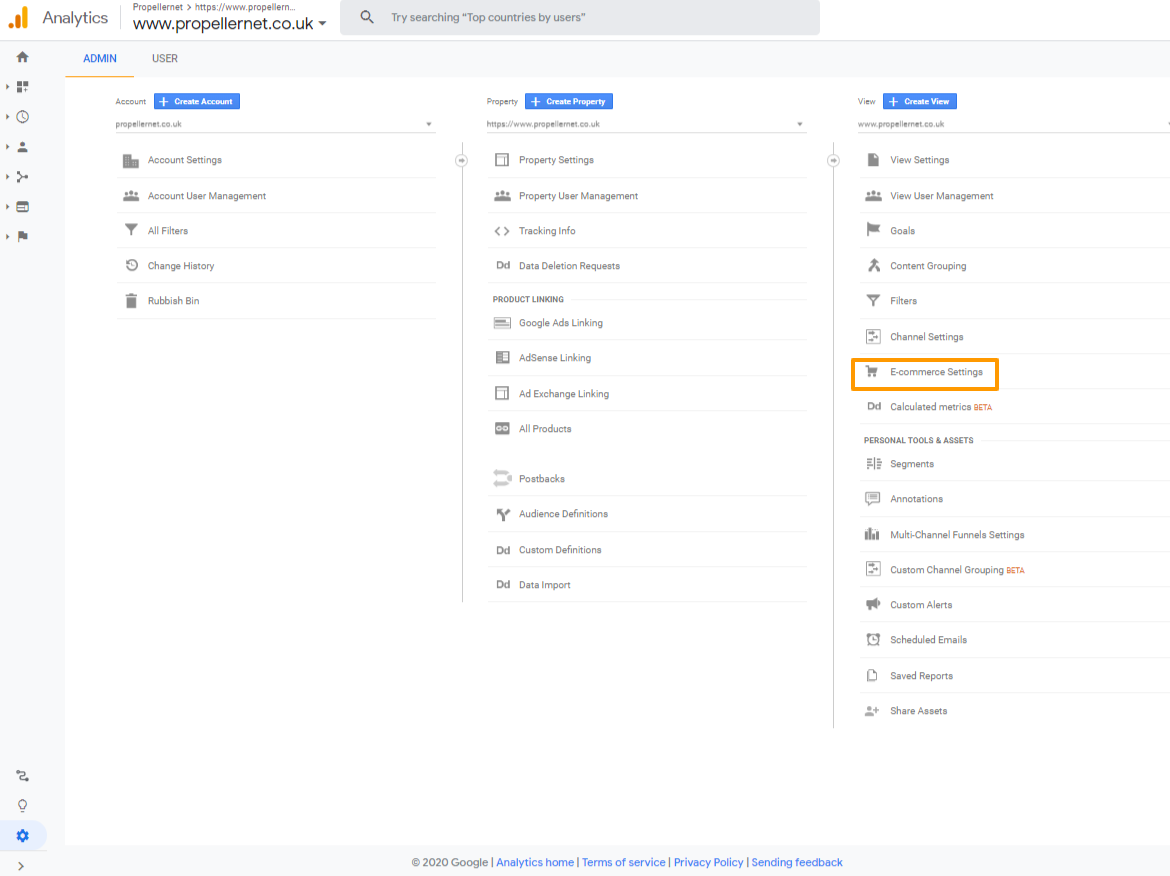
3.Enable Ecommerce in Google Analytics
This is fairly simple, in the settings of your Google Analytics account, select ‘Ecommerce Settings’ in your GA View and then select the button for Enable E-commerce and click ‘Save.
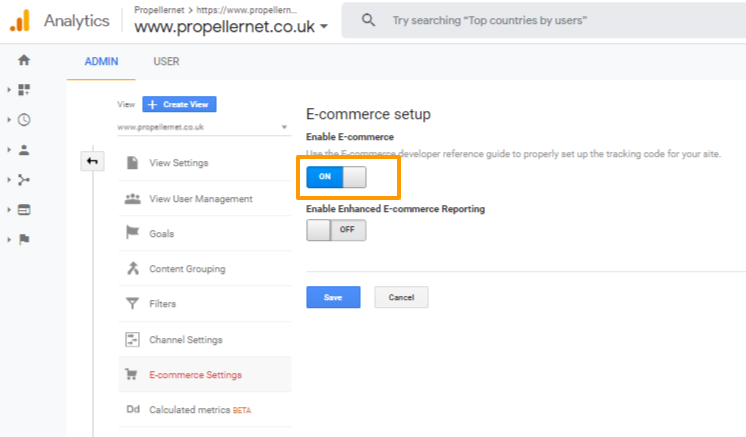
Do not hit ‘Enable Enhanced E-commerce Reporting’ as we are only setting up Standard Ecommerce.
Once this is done, make a test transaction and after a little while, you should see your transaction in Google Analytics
Want to see it in Action?
We have fired an Ecommerce Data Layer onto this page which can be seen by using tools such as Google Tag Assistant or DataSlayer. Use these tools to see the Data Layer and Transaction tag in action. Read our article on What is Google Tag Assistant and How to Use it Properly if you need help.
Conclusion
Anyone who sells products on their site should have Google Analytics Ecommerce setup, by following the above steps, you will be seeing the value of your traffic in no time.
Need Some Help?
If you’d like to find out more about how to Ecommerce Tracking come and join us at our Google Analytics Training and Google Tag Manager Training sessions. We also offer a wide range of Analytics services and Google Tag Manager consultancy services
Sign Up To Our Google Analytics Newsletter
Sign up to our Monthly Analytics newsletter with more tips & techniques on Google Analytics or Google Tag Manager, discover new tools and software to help you measure your traffic and hear about the latest news on Analytics and Tag Management


